
In order to design a Qualtrics task so that it can be used in StudyBuddy, you will first need to request access to the UF Marketing Behavior Qualtrics group library. Send Alan Cooke your GLID and he will request your access from the UF Qualtrics Brand Administrator.
Once you have access, there are two ways to set up your task for use in StudyBuddy: You can either (A) copy the SB_Task_Template and add your task materials to it, or (B) develop your task materials in a separate Qualtrics survey, then modify it to run in StudyBuddy. In general, the first approach is easier when you are creating a new task, while the second is easier if you have an existing study that you need to adapt to StudyBuddy.
Using the StudyBuddy Task Template
To use the SB_Task_Template to design your task, use the following steps:
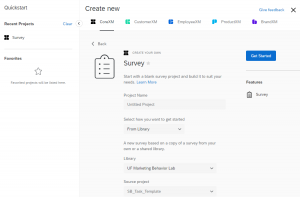
- Open Qualtrics from your UFL account and click the blue plus sign to add a new survey. Then slick Survey to create your own survey.
- Select “From Library” in the “how you want to get started” field, “UF Marketing Behavior Lab” from the Library dropdown, and SB_Task_Template in the StudyBuddy folder of the “Source project” field. Then, name your project and click the Get Started button.
- You will see four blocks. Do not edit the display_info block. Open the informed consent block and add the consent document that you submitted in your IRB protocol.
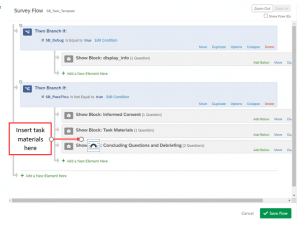
- Open the Task Materials block and either create your questions in this block or import your questions from an existing survey. IMPORTANT: If you are creating or importing other blocks of questions, you will need to edit your survey flow so that all of your new blocks occur in the SB_PassThru not equal to true branch between the Task Materials and Concluding Questions and Debriefing blocks as shown below.
- Open the Concluding Questions and Debriefing block and add any concluding questions, manipulation checks, and so forth that you need for your task. Finally, add a clear debriefing statement according to the directions in that question.
- Go to the start of your survey flow and add a new reference survey element. Select the UF Marketing Behavior Lab group library, and SB_Start_Task (in the StudyBuddy folder) as the survey. Move this element to be the very first element in your survey flow.
- Go to the end of your survey flow and add a new reference survey element. Select the UF Marketing Behavior Lab group library, and SB_End_Task (in the StudyBuddy folder) as the survey. Move this element to be the very last element in your survey flow. Save your survey flow. Note that you should NOT add an end of survey element to your task as the appropriate end of survey element is contained in the SB_End_Task library.
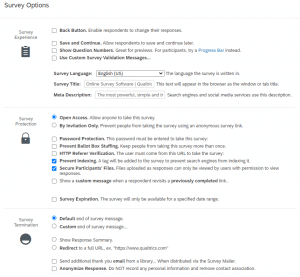
- Your Survey Options page should NOT use a back button or allow Save and Continue. It should be Open Access, and set to Prevent Indexing and Secure Participants’ files. Survey termination should use the default end of survey message. See below:
- Your task should be complete. You can now publish the study and copy the study link so that you can add the task to StudyBuddy.
Modifying an Existing Task for StudyBuddy
To modify an existing task so it can be used in StudyBuddy, use the following steps:
- Open Qualtrics from your UFL account and then open the Qualtrics survey where you have already designed your task.
- Create a new block that includes your informed consent document as specified in your IBR protocol. Place this block prior to any of your measures or elements in your survey flow.
- Create a new block that includes any concluding questions, manipulation checks, and so forth as well as a clear debriefing statement. Place this block after any of your measures or elements in your survey flow.
- Create a branch based on the conditional “SB_PassThru not equal to true” and put the Informed Consent, Task Materials, and Concluding Questions and Debriefing blocks, in that order under this branch.
- Create a block called display_info at the top of your survey. Create a display question within it, and display the following:
Task Info
participant_id=${e://Field/participant_id}experiment_id=${e://Field/experiment_id}flags=${e://Field/flags}SB_PassThru=${e://Field/SB_PassThru}SB_Debug=${e://Field/SB_Debug} - Create a branch based on the conditional “SB_Debug is equal to true”, and put the display_info block under this branch, prior to the SB_PassThru branch. You should now have a survey flow that looks like this:
- Go to the start of your survey flow and add a new reference survey element. Select the UF Marketing Behavior Lab group library, and SB_Start_Task (in the StudyBuddy folder) as the survey. Move this element to be the very first element in your survey flow.
- Go to the end of your survey flow and add a new reference survey element. Select the UF Marketing Behavior Lab group library, and SB_End_Task (in the StudyBuddy folder) as the survey. Move this element to be the very last element in your survey flow. Save your survey flow. Note that you should NOT add an end of survey element to your task as the appropriate end of survey element is contained in the SB_End_Task library.
- Your Survey Options page should NOT use a back button or allow Save and Continue. It should be Open Access, and set to Prevent Indexing and Secure Participants’ files. Survey termination should use the default end of survey message. See the survey options illustration in the previous section.
- Your task should be complete. You can now publish the study and copy the study link so that you can add the task to StudyBuddy.