
Researchers can easily use StudyBuddy to run online studies from the Research Pool Sona website. To do so, first ensure that all the tasks you wish to use have been created using the techniques discussed in https://site.warrington.ufl.edu/behavior-research-group/setup/.
Then go to StudyBuddy and open the Tasks page from the menu in the upper right corner. You will see a listing of the tasks in the system. You can toggle between active and inactive tasks using the slider in the upper right, and you can filter the returned tasks using the search field at the top of the page.
Adding a Task to StudyBuddy
To add a new task, click on the blue plus at the upper right of the page. This will result in a form in which you can enter a descriptive title for the task, an estimated average duration for the task in minutes, the full URL of the task as provided by Qualtrics, and a note field allowing you to enter information that helps you remember or communicate to others the details of this task or distinguish it from similar tasks. There is a also a checkbox that allows you to set whether the task is active (available to participants) or not. Repeat this process for as many tasks as you wish to add.
Adding a StudyBuddy Study to Sona
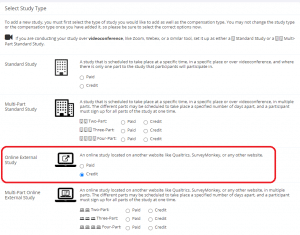
Once you have entered all your tasks, or you have found enough other tasks to combine into a (30-40 minute) study, you should create a study. First, you will go to the Research Pool Sona website and click “Add a New Study”. Select the Online External – Credit option as shown:
You will then see a form where you will fill in your study information, including the following required fields or changes to default settings:
- study name
- brief abstract
- detailed description
- researcher: This should be the owner of the study in StudyBuddy and primary contact.
- IRB approval code
- IRB approval expiration date
- course restrictions: Initially, you should open the study only to the Test Course for testing. After it has passed testing, you can open it to the appropriate course sections.
- Study URL: You should copy and paste this URL into this field: [su_note]https://apps.warrington.ufl.edu/study-buddy-public/api/study-buddy/redirect-to-next-url?experiment_id=XXX&participant_id=%SURVEY_CODE%[/su_note]You will need to change the XXX experiment_id code in a later step.
- shared comments: Anything about this study that you would like to communicate to the Lab Administrator.
- private comments: Anything about this study that you would like to have available to you as memory aid.
Click the Add This Study button to save the study. The resulting page will have a numerical value after “experiment_id=” in its URL. Copy this number, then select “change study information” from the study menu and change the XXX in the study URL to the code you copied. There should be no spaces internal to the study URL or at the beginning or end of the URL. Copy the credit token string from below for a later step. Save the changes.
Adding a Study to StudyBuddy
Once you have your study properly entered into Sona, you can create the study in StudyBuddy. To do so, use the following steps:
- Go to StudyBuddy and open the Studies page from the menu. Toggle the control in the upper left corner to view active studies if needed.
- Click the blue + in the upper right corner to add a new study.
- Enter the following study information:
- study name: This should be the same as in Sona.
- experiment ID: This is the numeric code that you substituted for XXX in the StudyBuddy URL in Sona.
- credit token: This is the long string you copied from your study information page in Sona.
- flags: any flags you want to use. Enter PT (Pass-Thru) for purposes of rapid testing. Multiple flags can be entered with dashes (but no spaces) in between.
- note: Any information about the study that you want available for your other the Lab Administrator’s easy access.
- Click the Add button to save the study.
- Once the study is added to the studies table, you can select it to edit it further. At the top, you will see a table containing the information you just entered. If you need to make further changes to this information, click the Edit button.
- Below the study information table is the study editors table. You can use the dropdown here to add other StudyBuddy users to your study so they are able to make changes to the study.
- Below this is the study task table. Use this to add tasks to your study and determine the order in which they are run. You can add an existing task using the green button, or add a new task using the grey button. The latter will take you to the task editor to complete the steps at the top of this document. Once you have all the necessary tasks added to the study, you can drag and drop them to set the task order. You can also view or delete a task from the study using the blue arrow and red X, respectively, in the actions column.
- The remainder of this page displays the estimated study duration (the sum of the task duration estimates for all tasks in the study) and stats about the actual study duration once it is running. It also provides information about the distributions of ratings (averaged across all tasks in the study) for each of the four task feedback metrics. These include: overall satisfaction, satisfaction with length, participant engagement and participant understanding.